Welcome to Bepa's Garden!
This blog is about organic gardening, healthy eating and healthy living.
Each month I will be posting Garden To-Do Lists, Tips & Techniques, Garden Project Plans, Photos from the Garden, Recipes and Book Reviews.
I hope you enjoy reading and I hope I can inspire others to start a backyard garden!
Happy Gardening!
~Rob~

Pages

Showing posts with label soil blocks. Show all posts

Wednesday, February 25, 2015

Waiting for spring...


It certainly doesn't feel like spring is just around the corner, especially when you look outside, but the grow room is already filled with germinating seeds waiting to make the trip out to the greenhouse, as soon as it warms up a bit of course!


This year I was actually able to start seeds on time so we can enjoy some early crops of kale, lettuce, spinach, cabbage and swiss chard. 

Blue Curled Scotch Kale
Lettuce
Red Express Cabbage
For the first time in several years I was able to start the artichoke and celery seeds on time as well. The taste of store bought celery just doesn't compare to celery fresh from the garden, but then again I guess that's true with just about anything!

Globe Artichoke
Utah Tall Celery
There are also trays of onions, leeks, broccoli, cauliflower and eggplant, as well as flowers and the herbs for medicinal and culinary herb garden. I think it's time for a larger greenhouse!

Lemongrass
Thyme
I can't believe it's been almost a year since I posted last, but things have been really busy and I have been spending more time to doing and less time talking about it. The school garden project has been consuming a lot of time, but it is well worth it. I have been working on crop planning, plant & harvest schedules and whittling down the 300+ varieties that I have in my seed collection to include only those varieties that we have had success with and want to keep growing year after year. 

This year there are some exciting projects planned, like the completion of the garden shed and construction of a self sufficient greenhouse at the school garden. I am also planning on {finally} building the garden shed for our home garden as well as a larger, more permanent, greenhouse so I have the room to grow enough vegetable seedlings and flowers to sell at farmers' markets. 

The big goal, as always, is to grow enough food for my family so we can eat mostly from the garden and spend less at the grocery store, and it looks like we are well on are way to doing that this year, weather permitting!

Stay tuned...

~Rob~

Sunday, April 6, 2014

Blocking up


94 degrees in the greenhouse!

Today I spent the morning blocking up some of the seedlings I started on Tuesday and enjoying the warmth of the greenhouse. As the sun rose higher it became so warm I had to open the vents to cool it off a bit.

The seeds seem to have germinated extremely fast, I started these just 5 days ago and most are ready to be blocked up to the larger soil blocks. I like to block them up as soon as they have two leaves so they don't get leggy.

Zinnias - Benary's Giant Mix 
Ageratum - Dondo Blue

This year I started mostly heirlooms and regional seeds and am getting almost 100% germination rates from each variety. They seem to be growing much faster than the seeds I started last year.


Cosmo seedling
Now the logistical game comes into play as I try to juggle the seedlings into the greenhouse during the day and back into the basement at night, until the nighttime temps stay above 50.

I was hoping to have the new shed and greenhouse built last fall, with electricity for the heating mats, so I could start and leave the seedlings right in the greenhouse. Hopefully this spring I can get them both built.


On Tuesday I started 10 mini trays using the 3/4" soil block maker. The small tool makes 20 blocks at a time and I can fit four of them into each mini tray, 80 blocks each x 10 = 800 seedlings. When I block up to the next size, which is 1-1/2", I can fit 40 blocks in each of the seedling trays, so I will end up with about 20 trays to maneuver around the greenhouse. That's just the flowers, herbs, early and cold crops, I still need to start the squash, pumpkins, more herbs and flowers, so you can see why I need a larger greenhouse!


Of course Bert had to come in to see what was going on before heading out to take a bath in the pool that I just refilled!


Now it is beginning to feel like spring,


The greenhouse is starting to fill with seedlings and will soon be overflowing with plants waiting to move into the gardens.

~Rob~

"A seed is sleepy,
but only until is it has found 
a place in the sun 
and it has had its breakfast 
and a drink of water.t
Then a seed is ...
awake!"

Dianna Hutts Aston

Monday, March 11, 2013

Starting Seeds in Soil Blocks: Blocking Up


 A couple weeks ago I did a post on Starting Seeds in Soil Blocks
This is the next step, called "Blocking Up". 

The purpose of "blocking up" is to give the roots more room to grow and to provide nutrients to the seedling. 

Blonde Du Cazard - Lettuce seedling in 3/4" soil block.
The seedlings, started on 3/1/13,  have formed their true leaves and have grown a healthy root system. They are now ready to go into the next size block which is 1-1/2".
Notice the root coming out of the soil block in the photos.


To make the 1-1/2" blocks you will use the next larger size block maker which works the same as the smaller one I used last time.


The process is also the same, you mix your compost with water to get a cement like consistency and then push the block maker into the mix to fill the cavities. Once filled you push down on the handle to dispense the blocks into your trays. The block maker has plastic cubes inside that create a 3/4" indent in each soil block for the smaller blocked seedlings to fit into.


This 1-1/2" soil block maker will make 4 blocks at a time so the work goes fairly quickly.


Once your larger blocks are made you simply pop the seedlings into the new blocks, it's that easy!


The seedlings will continue to grow, forming a nice root system that will stay contained in the block. When the roots reach the edge of the block they stop, waiting to continue growing when the plants are planted into the garden. The air space between the blocks prevents the roots from growing into each other.

Most of my seedlings will stay in the 1-1/2" blocks until they are ready to be planted into the garden. 


Lat year's lettuce before planting in the garden.
Soil blocks are easy to handle, eliminate the need to purchase seed starting trays or peat pots each year, and create stronger and healthier plants because they won't become root bound as they do in pots. There is also less root shock when transplanting because the entire block is planted into the garden.

There are so many benefits to using soil blocks and they are also a lot of fun to make!

~Rob~

Sunday, March 3, 2013

Starting Seeds in Soil Blocks


Seedling in 3/4" soil block.
 Friday afternoon I finally took some time off from working to get my seeds started. 
I started leeks, kale, eggplant, onions, lettuce, spinach, beets, lavender, marjoram, sage, parsley, thyme, rosemary, oregano and petunias, totaling 800 plants. This year I am not only starting seeds for our own garden, but also for the school garden and for a seedling sale to raise money for the school garden, so this is about a third of what I am planning to start.

Several years ago I started using soil blocks instead of seed starting trays to start all my seeds. I have had much better results with this method and it is much cheaper because I don't have to buy starting trays or peat pots each year.
To make soil blocks you need special tools called a soil block maker.


 The soil block makers come in different sizes, 3/4", 1-1/2", 2" and 4". The smaller 3/4" blocks are perfect for starting small seeds like lettuce, kale, herbs, etc, and the larger blocks work well for starting larger seeds like cucumber and squash. Soil block makers are available from several gardening stores such as Johnny's and are reasonably priced.

 Johnny's also has a video showing how to use a soil block maker.

There are soil mixes available specifically for use with soil block makers which I have used in the past, but I have had much better results mixing my own using my own compost.

The first thing I do is sift some of my compost with a fine screen to take out most of the stones, sticks and leaves.


After sifting, I am left with very fine compost and a little soil. The compost will absorb moisture, help hold the block together and supply nutrients to the emerging seed.


 The next step it to mix in a little water with the sifted compost. You don't want a soaking wet mix, so just add enough water to make a cement like mixture. If you take a handful of mix and squeeze it in your hand you want it to stick together without a lot of water coming out of it.


Once you have your mix ready, you will use your soil block maker to make your blocks.

3/4" soil block maker - makes 20 blocks.

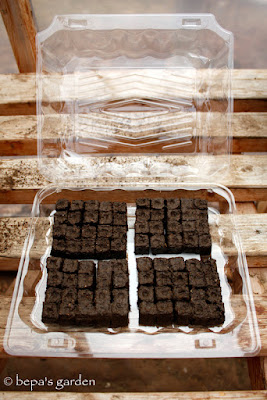
You simply push the maker into the mix, push it around to fill it with soil, and then press it out into your trays using the handle. The soil block maker creates a little dimple in the center of the block for the seed. I simply place a seed in the center of each block and tap it in using my small dibble, making sure it has good contact with the soil.


I use old lettuce containers from the grocery store. They are the perfect size, they hold 80 3/4" blocks each and make little greenhouses when closed.

I put them directly on my heating mats and keep them closed until the seeds start to germinate and the leaves start to form.


The concept behind using soil blocks is simple. 
The seeds are planted in the shallow dimple and are not covered by soil. Seeds started this way germinate faster because they have plenty of oxygen. Once the seedlings started in the smaller blocks have their first true leave, they are "blocked up" to the next larger size soil block. The 1-1/2 and 2" block makers form a 3/4" square hole in the block, allowing you to just pop in the 3/4" blocked seedling  without disturbing the roots.

Cucumber seedling in 3/4" soil block.

2" soil blocks with 3/4" dimples.

The roots will continue grow to the outer walls of the block and then stop. When the roots reach the edge they have ample air, water and nutrients so they will now send their energy into growing the plant which results in healthier seedlings. The plants will not become root bound like they do when using peat pots or plastic pots.

Basil seedling in 2" soil block. Notice how root growth stops at edge of block.

When planting the seedlings into the garden you simply make a hole large enough to fit the soil block and plant it into the garden. Planting this way doesn't cause stress to the plants because you are never disturbing the roots. By using soil blocks to start my seeds I have much higher germination rates, faster germination and healthier plants.

These seeds were started Friday afternoon and Saturday morning they have already begun to germinate!

Kale seeds beginning to germinate.
Lettuce seeds emerging.


Lettuce in 2" soil blocks (photo taken last spring)

Shared at:

Deborah Jean's Dandelion House
Tilly's Nest 
The Backyard Farming Connection 
Eat, Make, Grow


Bert and Ernie - just a year ago!